Tuesday, September 9, 2014

Use NuGet with SharePoint

Recently, while working on creating some custom features for SharePoint 2013, I got a bit of frustration trying to make a NuGet package work with SharePoint.
While the Nuget package was installed and didn't give any error in the code, at run time it was either not working at all but not showing any error, or giving a missing assembly error.
I, then found out that it was because the package created by the NuGet manager was not linked to the package that is created with the WSP and I had to add the library reference manually.
Here's how:

  1. Add the NuGet package you wish to use:


  2. You will notice that the dll is added to your references and is also added to the package


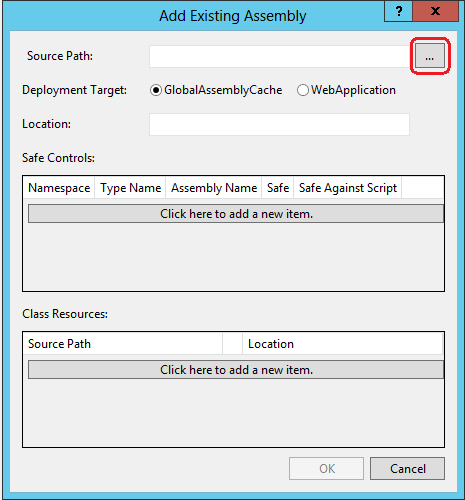
  3. That, however, will not be added to the SharePoint package, so let's add it manually


    In the popup Window, click the "Browse" button and make sure you browse to the current project, select the right package and add the right assembly.  


  4. And, Finally save the change you just made


  5. From this point on, the NuGet Package should work with no issue in your SharePoint project.

Hope this was helpful.

Friday, February 15, 2013

Allow anonymous access to SharePoint application pages in the _layouts directory

Often times, you need to add your own custom application pages (aspx) to SharePoint, which are deployed to the ‘_layouts’ directory. These types of pages could consist of a custom login page, maintenance pages, or even complete web applications that you’ll have live in SharePoint. But what if your web application has an authentication provider set up, such as Claims or Windows? In this article, I’ll show you how easy it is to allow anonymous access to these pages without forcing a user to log in.

Create the project

  1. In Visual Studio 2010, create a new “Empty SharePoint Project” and name it “MyAnonymousWebPages”.
    Click OK
  2. Enter your SharePoint site
  3. Select “Deploy as a farm solution”

Adding the custom Pages

Next, we need to map the ‘layouts’ directory to our project, so our files are deployed
there.
  1. Right click on the project name ‘MyAnonymousWebPages’ > Add > SharePoint “Layouts”
    Mapped Folder
  2. SharePoint will automatically add a folder under ‘layouts’ with the name of our
    project. Right click on this folder >Add > New Item > Application Page
  3. Name the page “HelloWorld.aspx”
  4. Your project should now look like this:

Allowing anonymous access

So far, we haven’t done anything special. The steps we’ve taken is the basic approach
to adding custom application pages. In the following steps, we will inherit from “UnsecuredLayoutsPageBase”. This is a base class for application pages that do not require the user to have any permissions.
  1. Open up HelloWorld.aspx.cs
  2. By default, the page is inherited from “LayoutsPageBase”. Change the inheritance
    from “LayoutsPageBase” to “UnsecuredLayoutsPageBase”. 
    public partial class HelloWorld : UnsecuredLayoutsPageBase
  3. Next, we need to override a property of the UnsecuredLayoutsPageBase, to allow the
    anonymous access. Be sure to change the ‘getter’ to return true 
    protected override bool AllowAnonymousAccess { get { return true; } }
  4. Add some content to your markup in the ‘PlaceHolderMain’

Deploy the solution

  1. Right click on your project name, and select ‘Deploy’
  2. Once deployment is complete, browse to your page by navigating to
    http://{yourSharePointUrl}/_layouts/MyAnonymousWebPages/HelloWorld.aspx
  3. See your custom page, like below (notice, by default, the ApplicationPage template
    in Visual Studio is designed to automatically inherit from the master page. You
    could instead replace the markup with markup from a standard aspx page template). 


Huge thanks to Tim Gabrhel for the wonderful information

Friday, November 16, 2012

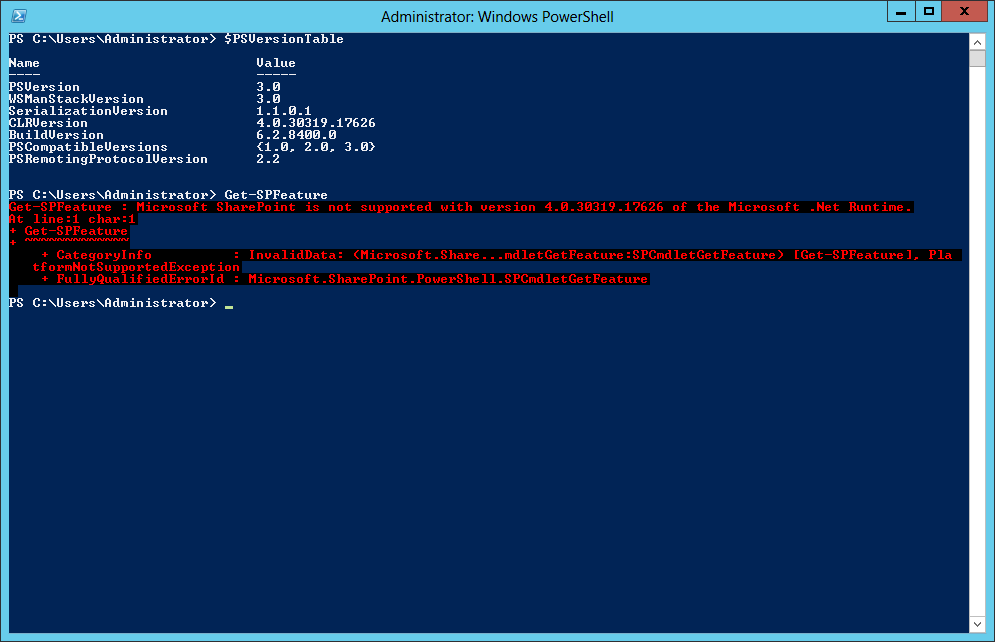
SharePoint 2010, server 2012 and Powershell 3: Microsoft SharePoint is not supported with version 4.0.30319.17626 of the Microsoft .Net Runtime

If you are running SharePoint 2010 on a Server 2012 OS be aware of the current compatibilty issue that is identified with SharePoint Powershell and Powershell 3.

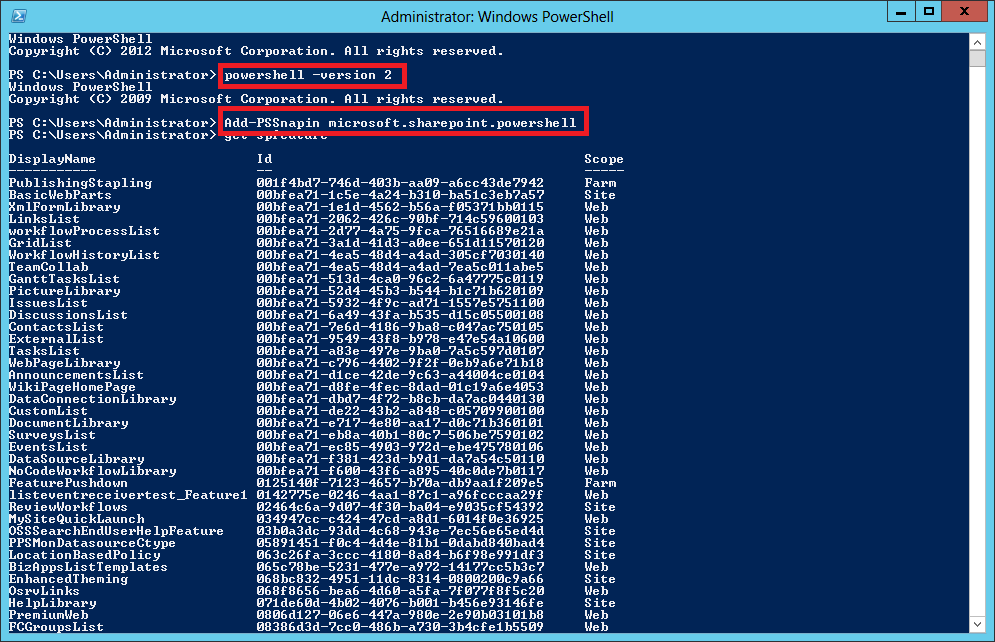
In order to make use of the powerfull powershell commands, all you need to do is switch the powershell version back to version 2.
Note: This will not uninstall version 3, it will simply launch a new powershell instance that uses version 2.

There I fixed it!

Information from Tom Van Gaever

Tuesday, August 21, 2012

PowerShell Commands To List SharePoint Features


The more I work with SharePoint 2010 the more I am starting to love PowerShell. My scripting skills are pretty basic (!) but here are a couple of useful little snippets to get back some information from a site that previously I would have spent a while going through the UI or SharePoint Root – mainly as a reminder for myself!

List all installed features on the farm
It’s really straight forward using the Get-SPFeature command to return all installed features. To provide a little more readability to the output it can be sorted as follows:

By feature display name alphabetically,

Get-SPFeature | Sort -Property DisplayName

By feature ID,

Get-SPFeature | Sort -Property Id

By feature display name alphabetically and grouped by scope,

Get-SPFeature | Sort -Property Scope,DisplayName | FT -GroupBy Scope DisplayName,Id

And to write this to a file to allow for viewing in Notepad, Excel etc,

Get-SPFeature | Sort -Property Scope,DisplayName | FT -GroupBy Scope DisplayName,Id > c:\AllInstalledFeatures.txt


List all activated site scoped features
Especially in the case of hidden features it’s sometimes necessary to track down if a feature is active on a site collection. Here’s a quick way of seeing which features are activated for an SPSite:

Get-SPFeature -Site http://sitecollectionurl | Sort DisplayName | FT DisplayName,Id

List all activated web scoped features
And only slightly modified from the Get-Help Get-SPFeature -examples text, here is a command to list all web activated featres for a site collection:

Get-SPSite http://sitecollectionurl | Get-SPWeb -Limit ALL | %{ Get-SPFeature -Web $_ } | Sort DisplayName -Unique | FT DisplayName,Id

Information given by Glyn Clough

Thursday, July 12, 2012

Error message: (provider: Shared Memory Provider, error: 0 - No process is on the other end of the pipe.)

This is the common error when we are working with sql server.It will occur while establishing a connection to sqlserver.In this post i will explain how to resolve network and remote connection error.First we need to check the given data source name is correct or not in connection string.The TCP/IP protocol or in some instance the Named Pipes protocol should be enable to made such type connection.The following steps will describe how to enable TCP/IP or Named Pipes protocol in sql server configuration manager
Go To-->Configuration Tools folder which is in MS Sql Server 2008 folder in start menu
2.Select server Network configuration-->click on protocols for SQLEXPRESS.
Then we can see the protocols at Right side panel.By default the TCP/IP status is in disable mode.So we need to change status to enable

 3.Select SQL Server Services --> right-click on your instance of SQLEXPRESS / SQLServer and click "restart"

Reference

Thursday, September 15, 2011

Where is “Save As Template” in SharePoint 2010?

When publishing feature is enabled in SharePoint 2010, the “Save As Template” option would magically disappear. A quick solution to this is by manually using the URL /_layouts/SaveTmpl.aspx

Info from here

Thursday, August 18, 2011

Hide First Tab in SharePoint 2010 Navigation

I created a blog post on this for SharePoint 2007 HERE: But SharePoint 2010 is a bit more complex. Since it uses UL’s and Li’s for it’s navigation it is a bit harder to hide just one element.
image
You will notice that the Home tab actually is the first node and then has a child UL which represents the rest of the navigation Items. So the approach is to hide the first <li> <a> (display: none) and then simply just use (display:block ) to show the hidden <ul> <li> <a> tags.
Here is the CSS you could use to hide just the first node (home) tab in a SharePoint 2010 application:
.s4-tn li.static > a{
display: none !important;
}
.s4-tn li.static > ul a{
display: block !important;
}

image
Enjoy!

Information given by Erik Swenson

Monday, May 16, 2011

Easy way to Redirect Users to an Error Page in SharePoint

We as developers catch exceptions and try to gracefully educate our users on what might have gone wrong and what they are supposed do in the case of an error. If and how we notify the user depends largely on the type of exception as well as the type of SharePoint component i.e. Web Part, Event Handler etc.
Web Parts generally should show error messages within the web part. While event handlers will need to show the errors in a log perhaps. There is also another way, an easy way to show these type of errors.OOTB the WSS API provides a sleek one liner to handle things that go wrong in custom SharePoint components and show the system error page with our custom message.
The one liner:

SPUtility.TransferToErrorPage()

You can even pass a link so the user has a choice to come back to the active\home page of the site and start again

Information given by Rai

Tuesday, April 12, 2011

HOW TO:Forms Based Authentication (FBA) on SharePoint 2010

Information comes from Donal Conlon  
 

There are not a lot of differences with configuring FBA for SharePoint 2010 compared to 2007, but there are a few.  For instance, SharePoint 2010 no longer supports “classic FBA”, rather forms based authentication is provided through Claims Authentication.  There is also the introduction of the Secure Store Service which is the next-gen of the Single Sign On service of old.
Both of these come into play when configuring Forms Based Authentication.
Mission
Configure an extranet web application for Claims based authentication using AD and Forms.  Store membership credentials in a SQL database.  Manage members through IIS Manager.
Game Plan
1. Configure SQL for membership store
  • Create database
  • Create SQL User
  • Add SQL user to database
2. Configure Central Admin to use SQL membership store
3. Configure Secure Store Web Service to use SQL membership store
4. Create new Web Application for extranet site
5. Configure Extranet site to use SQL membership store
So let’s begin…

1. Configure SQL for membership store

The process of creating the store is exactly the same as what we did for 2007, so I’ll just copy and paste that thank you!
The membership store is still created using the ASP.NET SQL Server Setup Wizard.  This is launched from the .NET 2.0 Framework folder on the server at:
C:\Windows\Microsoft.NET\Framework\v2.0.50727\aspnet_regsql.exe
This wizard will take you thorough the steps and will build out the SQL database for you.
alt
Once you select to Configure SQL Server for application services, you will be prompted for the SQL Server name and database name.  You can choose an existing database to add the membership elements to, or you can type in a new name and the database will be created for you.
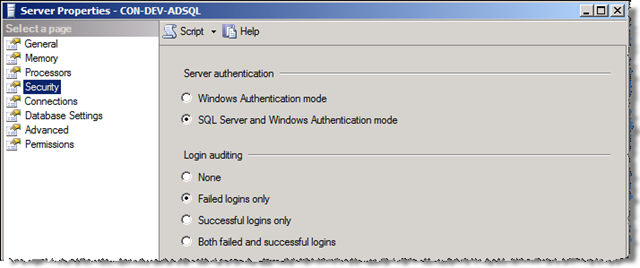
Once the database is created, we’re going to create and add a SQL user, rather than use integrated authentication.  If your SQL instance is not already running in mixed-mode, you can change it through Server properties in SQL Server Management Studio.  Right-click on Server in Object Explorer and select Properties, then navigate to the Security page.
image
Create SQL user
Back in object Explorer, expand Security –> Logins.  Right-click logins and select “New Login…”  On the New Login page, enter a username, password on the general page, clear all three password options for policy, expiration, and enforce change. Hit Ok and we have our SQL user.
image
Add SQL user to membership database
Now, navigate to the database we created for our membership earlier (ConlosoDevFBA), and expand to Security-> Users.  Right-click on Users and select New User….
image
Enter the name, select Login name, and give this fella the role “db_owner”.
To recap:
We created a database called ConlosoDevFBA.
We created a SQL user called FormsAuthUser
We added FormsAuthUser to ASPNetFormsAuth database and gave them the db_owner role.
We’re done with SQL.

2. Configure Central Admin Web Site to use SQL Membership Provider

SharePoint web sites out of the box are configured to use Active Directory.  So you may be wondering why we’re configuring Central Admin to use FBA when we don’t really want to login in as an FBA user.  Well, we actually don’t want to configure it to to login as a forms user, but we do need to be able to add users from out membership database when configuring site collection admins, and the like.
So all we want to do is tell the Central Admin web application to use our SQL membership provider as well as AD, so when you use the people picker to select users, it will provide results from our membership database.
Open IIS Manager on the WFE server (if more than one, then this needs to be done on every FWE that has Central Admin.  The same goes for the proceeding steps for the other web applications).
Select the SharePoint Central Administration v4 site.  On the Home Page, you’ll see many options for ASP.NET and IIS.  The ones we’re concerned with are
image
Open the Connection Strings Page.  Under Actions menu on the right, select Add… to create a new connection string.  Provide the details for the membership database for the new connection string.
image
Add Role Provider
Go back to the Web Application page and open up Providers page.  Here we will create a provider for Roles and Users.  Set feature to .NET Roles and click Add… in the Actions pane to add a new role provider.  I called it FBARoleProvider and selected the right type and connection string.
Ensure you provide an ApplicationName so the provider knows what uses to authenticate.  For a good explanation on why you need this, see Scott Guthrie’s blog.
image
Add Membership Provider
Now set feature to .NET Users and click Add… from the actions pane to add a membership provider.
image
Select the correct type and connection string, and whatever behaviors you choose.
That’s it for the providers for Central Admin.
To verify that all looks ok, we can check the web.config of the web application.  To get to the right web.config, right-click on the web application under sites, and select Explore.
image
In the web.config, you’ll see sections for the connection string and the providers.  The <roleManager> and <membership> sections should look like:
image
You should also see a <connectionStrings> section close to the bottom of the web.config file.

3. Configure Secure Store Web Service to use SQL Membership Provider

Everything we did for Central Admin site, we are going to do for the SecurityTokenServiceAppliaation which is in the SharePoint Web Services application.
image
Without redo’ing all the steps:
  • Create the connection string
  • Add the .NET role provider
  • Add the .NET users provider
    Verify connection by editing config.xml.

4. Create Extranet Web Application

Ok, finally we are ready to create our web application (called SharePoint – FBA) that will use FBA authentication.
In Central Admin, Select the Application Management page, and select Manage web applications.  Select New from the ribbon to create a new web application.
Select Claims Based Mode Authentication as Authentication Type.  Select values for all the other options until you get to the “Enable Forms Based Authentication”.
Add the values we created earlier in the section “Enable Forms Based Authentication” for role and membership provider.
image
Once the application is created, we should create a site collection.
Create Site Collection
Go to the Create Site Collection page from the Manage Applications section in Central Admin.  Select the team (or blank, or whichever you choose) template then select the site collection administrator.  At this point, we should be able to select from our SQL membership users.  Enter a user you know exists in the membership database and see if you can resolve the names.
image
I have a user with the same name in both AD and SQL, so I know I am hitting both.
Note: I jumped ahead here and added users through IIS Manager.  If you have been following this article to the letter, then you will obviously not see users in your membership database.  Do not worry about this piece for now, as you will add users to your membership store later.
At this point we have told SharePoint what role providers to use for the web app, but we still need to configure the web app through IIS manager to bind the providers.
Configure Membership Providers for Web App through IIS
In IIS Manager, browse to the new site SharePoint – FBA. For our new FBA site we need to do the following:
  • Add connection string
  • Add Providers for members and roles
  • Configure .NET Roles
  • Configure .NET Users
  • Set Authentication to Forms and Integrated
  • Add User as Site Collection Admin
image
1. Add Connection String
Same as we have done before.
image
Note: we could potentially just do this for the machine, and not have to do it for every web application.  I prefer to do it for every web app, as I’ve had mixed results otherwise.
2. Add role and user providers
Again, same as what we did before.  Open Providers page and add an entry for our role and user providers.
image image
3. Configure .NET Roles
This and the next steps are not required for the other two web applications we configured (Central Admin and SSS).
Open the .NET Roles page for our web application.  You will receive a warning that the default role provider is not trusted.  WE just need to set our default role provider to FBARoleProvider.
image
We do not have any roles in our database at this point, so let’s create two (StandardUser, SuperUser) by clicking Add… in the actions pane.
image
4. Configure .NET Users
Now we need to do the same for .NET Users.  Open the .NET Users page.  You will get a similar warning saying the default is not trusted.  Set the default provider to FBAMembershipProvider. If you had members in the database, you would now see them listed.  Assuming you don’t let’s add some.  Click Add… from the Actions pane to add users, and assign them roles.
image image
5. Set Authentication
SharePoint should have done this when you created the web application, but let’s confirm.  From the web application home page in IIS Manager, select Authentication under the IIS section. Confirm that the web application has both Integrated and Forms enabled.
6. Add User as Site Collection Admin
Now that we have everything hopefully configured correctly, we can go back to SharePoint Central Admin and add our new user as the Site Collection Administrator.  From Central Admin Application Management page, click Change site collection administrators.  Select SharePoint – FBA root site collection, and add our new user.
image
Now lets test all this business by trying to login.  Browse to your site and select to login as a forms user.
image
What the…?!  I am authenticated ok, but am not allowed in, even though I’m a site collection admin?!
Caveat
Here’s the caveat – In order for you to use IIS Manager to manage your SQL users, you need to set the default provider to our Forms provider, i.e. FBAMembershipProvider.  In order for it to work we need to set it to the SharePoint claims provider.  Go back to .NET Users and reset the default provider to “i” which is for the Microsoft.SharePoint.Administration.Claims.SPClaimsAuthMembershipProvider
image
You could work around this by creating another IIS web site, configure the same way you did for SharePoint – FBA, and use that for managing users.
You should also check the default Role Provider for the web application and ensure that is set to “c”.  If this is set to the SQL provider that you created, you will get an unexpected error after you logon.
Now let’s try to login again…
image
Success!!
To verify all of the above: here are the three web.config files in play:
Central Admin Web.config
<roleManager>
  <providers>
    <add name="FBARoleProvider" type="System.Web.Security.SqlRoleProvider, System.Web, Version=2.0.0.0, Culture=neutral, PublicKeyToken=b03f5f7f11d50a3a" applicationName="/" connectionStringName="FBADB" />
  </providers>
</roleManager>
<membership>
  <providers>
    <add name="FBAMembershipProvider" type="System.Web.Security.SqlMembershipProvider, System.Web, Version=2.0.0.0, Culture=neutral, PublicKeyToken=b03f5f7f11d50a3a" applicationName="/" connectionStringName="FBADB" enablePasswordReset="true" enablePasswordRetrieval="false" passwordFormat="Clear" requiresQuestionAndAnswer="false" requiresUniqueEmail="false" />
   </providers>
</membership>
Secure Store Web Service web.config
<membership>
   <providers>
       <add name="FBAMembershipProvider" type="System.Web.Security.SqlMembershipProvider, System.Web, Version=2.0.0.0, Culture=neutral, PublicKeyToken=b03f5f7f11d50a3a" applicationName="/" connectionStringName="FBADB" enablePasswordReset="true" enablePasswordRetrieval="false" passwordFormat="Clear" requiresQuestionAndAnswer="false" requiresUniqueEmail="false" />
   </providers>
</membership>
<roleManager>
   <providers>
       <add name="FBARolePRovider" type="System.Web.Security.SqlRoleProvider, System.Web, Version=2.0.0.0, Culture=neutral, PublicKeyToken=b03f5f7f11d50a3a" applicationName="/" connectionStringName="FBADB" />
   </providers>
</roleManager>
Web Application (SharePoint – FBA) web.config
<membership defaultProvider="i">
  <providers>
    <add name="i" type="Microsoft.SharePoint.Administration.Claims.SPClaimsAuthMembershipProvider, Microsoft.SharePoint, Version=14.0.0.0, Culture=neutral, PublicKeyToken=71e9bce111e9429c" />
            <add name="FBAMembershipProvider" type="System.Web.Security.SqlMembershipProvider, System.Web, Version=2.0.0.0, Culture=neutral, PublicKeyToken=b03f5f7f11d50a3a" applicationName="/" connectionStringName="FBADB" enablePasswordReset="true" enablePasswordRetrieval="false" passwordFormat="Clear" requiresQuestionAndAnswer="false" requiresUniqueEmail="false" />
  </providers>
</membership>
<roleManager cacheRolesInCookie="false" defaultProvider="FBARoleProvider" enabled="true">
  <providers>
    <add name="c" type="Microsoft.SharePoint.Administration.Claims.SPClaimsAuthRoleProvider, Microsoft.SharePoint, Version=14.0.0.0, Culture=neutral, PublicKeyToken=71e9bce111e9429c" />
            <add name="FBARoleProvider" type="System.Web.Security.SqlRoleProvider, System.Web, Version=2.0.0.0, Culture=neutral, PublicKeyToken=b03f5f7f11d50a3a" applicationName="/" connectionStringName="FBADB" />
  </providers>
</roleManager>
 
 
Information comes from Donal Conlon 

Change SharePoint authentication from classic mode to claims based

Recently I was in a situation to enable form authentication for a SharePoint web application that was configured using classic mode authentication. So the solution for me is to change the authentication mode to claims based.
Caution: Be noted that once you migrated the authentication provider to claims based, you can not revert it back.
(In 2007 version, the option was to extend the web application on the same content database, and enable form authentication, but there were some troubles always as I need to deploy the dll to bin folder in both web applications, original and extended. Also there were other troubles for deploying smart parts. )
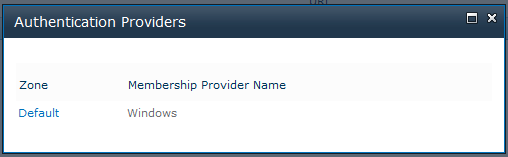
From the central administration, I checked the authentication provider and it is showing my current authentication provider as windows.
clip_image001
Now I am going to change my authentication provider, to do this, you need to use windows powershell.
From the start menu, go to
All Programs -> SharePoint 2010 products -> Sharepoint 2010 Management Shell
clip_image002
The power shell window is opened as follows.
clip_image004
Execute the following commands
$WebAppName = “http://win-hgdsnnuakhv
$account = "WIN-HGDSNNUAKHV\Administrator"
$wa = get-SPWebApplication $WebAppName
Set-SPwebApplication $wa –AuthenticationProvider (New-SPAuthenticationProvider) –Zone Default
When you execute this command, a confirmation message will appear on the screen as follows.
clip_image006
Type Y for confirmation
After the command executed successfully, check the authentication provider from the central administration, it will show “claims based authentication”
clip_image007
Now execute the following commands.
  • set the user as an administrator for the site
$wa = get-SPWebApplication $WebAppName
$account = (New-SPClaimsPrincipal -identity $account -identitytype 1).ToEncodedString()
  • configure the policy to enable the user to have full access
$zp = $wa.ZonePolicies("Default")
$p = $zp.Add($account,"PSPolicy")
$fc=$wa.PolicyRoles.GetSpecialRole("FullControl")
$p.PolicyRoleBindings.Add($fc)
$wa.Update()
  • perform user migration
$wa = get-SPWebApplication $WebAppName
$wa.MigrateUsers($true)
Reference: http://technet.microsoft.com/en-us/library/gg251985.aspx and http://weblogs.asp.net/sreejukg/archive/2011/03/25/change-sharepoint-authentication-from-classic-mode-to-claims-based.aspx

Wednesday, March 23, 2011

SharePoint Foundation Master Page Picker

By Stu


I recently began a new SharePoint 2010 branding project that requires only SharePoint 2010 Foundation be used. If you have worked in a purely Foundation environment you have probably quickly realized that there are no tools in Site Settings to allow you to select an alternate Master Page. So how do you create a custom branded Foundation Site if you cannot even select your new Master Page for testing or deployment? I found a great solution in the “Foundation Master Page Picker” on CodePlex and here is how to set it up!
SharePoint branding requires a lot of trial and error development. You can always start by developing your front-end code as pure HTML and CSS but eventually you have to deploy the code to a master page and get it working in SharePoint. Once you have done this, it’s matter of testing and tweaking until you get it just right. SharePoint injects a number of CSS classes that can mess with even the cleanest markup and it’s never as easy as simply injecting your pristine code and calling it done.
But what about SharePoint 2010 Foundation sites? The intent with Foundation was to use the theme system to change the look and feel. This is very apparent when you look at the site settings. There are no options for selecting a new master page and rather than modifying the v4.master, wouldn’t it be better to leave that in place as a backup? Building a new master page with a name that fits your project is always preferable to modifying the existing or default master pages.
In my research I found a great solution on CodePlex called the SharePoint Foundation Master Page Picker. However, if you are not familiar with SharePoint administration installing and deploying a solution can be intimidating and there is at least one gotcha I found with this solution that you should know about.
Download the solution
To start with you need to go get the solution. Download it from CodePlex and save to a folder on your SharePoint server.
Install the solution
The next thing you need to do is install it. To do this you are going to use stsadm.exe. This is a command line application used to numerous administration tasks on your server.
1. Open a command prompt – you can select it from your program menu or select Start and type cmd in the “search programs and files” box
2. Navigate to stsadm – stsadm is located in the hive. In command prompt you navigate by typing “cd” followed by a space and folder you want to open. On my server the path to stsadm is: c:program filescommon filesmicrosoft sharedweb server extensions14bin

3. Install the solution – now that we are in the bin we can execute commands against stsadm. To install this solution you need to run the following command:
stsadm -o addsolution -filename c:{your folder name here}IBS.SharePointFoundation.Utilities.wsp
You should get a confirmation that the solution was successfully installed, if not, check your command for extra spaces or other simple errors and try it again.

4. Deploying the solution – The next step is to deploy the solution. There are things that need to go into the GAC and running the “deploysolution” command will do this for us. There is a very specific way in which you need to deploy this solution and I only discovered through trial and error. Use the following command to deploy the solution:
stsadm -o deploysolution -name IBS.SharePointFoundation.Utilities.wsp -local -allowGacDeployment

5. Activate the Feature – Installation and deployment are now complete, all we have to do now is turn the functionality on. This is a site collection feature so navigation to the site settings page of the top level site in your site collection. Under Site Collection administration you will find a link to Site Collection Features, click on this link and activate the Master Page Picker feature.

6. Select a new master page – You’re done! To select a new master page for your Foundation site, go to Site Settings>Look and Feel and select the Master Page Picker. You will see a list of available master pages allowing you to select the one you want and click OK to change the master page.

Once you have created your custom master page and dropped it into the master page gallery it too will appear on this list as an available option.


Information from Stu